Sunday 28 April 2013

Chipped Paint

With the great feedback from my Leman Russ Exterminator, I have been looking at ways of expanding on my weathering effects to make them both easier to create and even more realistic. One of the most time consuming parts is adding all the little paint chips, as the individual highlights and shading of every chip starts to add significant time to a project. Many modelers with access to an airbrush speed this process up by using hairspray and salt crystals, or another masking agent, as an undercoat to the final layer and then dissolve this final layer allowing a previous undercoat of rust or metal to show through. Quite ingenious!

'Basecoat' of drybrushed metal, sealed twice with clear coat.

I thought I would try this myself using spray cans only, but instead of pre-applying the chipped areas before the final coat I used a cheap and hardy clear-coat to seal the base coat, and actually chipped the final layer away using a sharp knife or sculpting tool. As such I have spent most of the weekend waiting for paint to dry, but the results are promising.

I will be drilling the gun barrels soon!

Even following my usual procedure for spraying on a cold (and wet!) day, I was not prepared for the lengthy drying times, and to be sure the clear coat had dried fully I allowed 24 hours between it and the final coats of Desert Yellow and Army Painter 'British Armour'. These were only touch dry when I started to scrape this evening, but the results are already looking good:

Now to add some rust and dirt using pigments, glazes and washes.

As you can see, I need to be more careful with the drybrushing undercoat where it will show through in larger sections, and I am not sure whether to edge highlight before scraping, or do it all in one go including the edges of the chips. I have three of these Killa Kans to paint, so I will let you know how it goes. I will also be letting the paint dry before chipping any further to see whether this affects how easily the paint chips. At the moment it's still wet and slides around, rather than chipping neatly as desired. Watch this space!

Saturday 20 April 2013

A Retrospective (or "Orks through the Ages")

This week marks six months of blogging, and a re-branding of sorts. I have taken the opportunity to make the blog easier to remember by renaming from "The Far Seeing Eye" (an obscure Blood Angels special rule) to instead match the blogger url of heavensteeth.blogpsot.com. "Heaven's Teeth" is also an obscure Blood Angels reference, but is a lot snappier, easier to remember and has minimal competition when entered into Google. I hope this makes me easier to find, and it seems blogger has done all the hard work in the background with renaming of blog entries, bookmarks and such. The header will probably change too, but that's for another day.


Most blogs reflect upon the progress of the blog itself at a certain milestone, but the proof is in the pudding (in this case by clicking on 'completed projects' above) so I want to talk about my painting progress in general and what a solid six months of it has done for my skills. Professional painters always talk about 'practise, practise, practise' and it's all well and good for them doing it 40-80 hours a week, and I would think that their skills but also speed would increase exponentially, probably at the same rate as their hobby enthusiasm falls away. (As a mechanic I have minimal desire to work on my own car on my time off, so I admire any professional painter who maintains the enthusiasm to collect and paint their own armies!). For my own part, even sticking to a once weekly blog post has forced myself to follow through on projects I may have abandoned in the past due to lack of enthusiam, and I often learn something along the way.


So by way of blowing my own trumpet (or tooting my own horn for those in North America) I'd like to share a selection of models from my past, inspired by a recent blog post of a fellow blogger. Orks have always been my 'go to' army of any games system, as they reward bright, quick and colourful paint jobs just as much as the gritty "grim dark" style which sometimes takes twice as long with half the tabletop visual effect. Above you can see the current test model for the latest reincarnation of my Ork army, and below how things have looked over the years.


As you can see, quite a change from my first few models while in high school, then jumping back into the hobby with a red armoured Kult of Speed. I increased the colour palette a bit in 2010 then started and handful of models in a pseudo camouflage with very bright tones, and now I am using some of the new weathering techniques I have been trying out on my Imperial Guard to give the Orks a more 'realistic' look (if you can really paint green skinned aliens realistically).

So where am I now? As you can see from the two top photos I have shaded my latest model using glazes, and mixed some pigments to weather the metals and leathers. I have also highlighted using blue on the skin in a daring attempt at colour theory (blue and green are next to each other, a lot of people shade with red but I thought of going the other way), and it has really worked quite well. I am also trying to vary my shading to reflect the type of surface, with broad soft highlights for cloth and leather, and sharper highlights for teeth and metal which would catch the light. These are all ideas and techniques I would never have attempted without setting myself some painting goals, so I challenge you to do the same! I look forward to the next six months and beyond.

Thanks for dropping by!

Friday 12 April 2013

Battle Report: 6th Ed Chaos Daemons vs Tau/IG/BA

Well I've missed the bus on this one. In an effort to bring you an up to date Chaos Daemons Battle Report using the 6th Edition Codex I have been caught off guard by the release of the new Tau Codex! So here we are, a 2v2 game involving the new Daemons but the old Tau. I'm sure it would have turned out quite differently had the Tau access to all their new tricks, but that's purely speculative, so stay tuned for some 'Tau 2.0' love in the future.


This Battle Report illustrates the benefit of running larger squads of Chaos Daemon infantry, particularly in light of their new 'normal' deployment, some of the new Psychic Powers, flying Mounstrous Creatures, Skyfire Soul Grinders, and a few interesting rolls on the Warp Storm table. Enjoy!


The armies themselves were four separate 1250pt detachments combined for a 2500pt game. The Daemons ran a solo Khorne army with Bloodletters, Hounds, Juggernauts and a flying Bloodthirster. The rest of the Chaos force comprised of a Keeper of Secrets, Soul Grinders, Daemonettes and Plaguebearers. Across the table were a pair of Hammerhead tanks, three Firewarrior squads, a Crysis Suit commander and Deep Striking Suits with melta/flamer combos. The Imperial Guard brought a 30 strong Infantry Platoon, Penal Legion Troopers, a Leman Russ Exterminator with Pask, a Vanquisher, and a Death Company Stormraven with minimum 3 Death Company and Librarian to make the allied detachment legal.


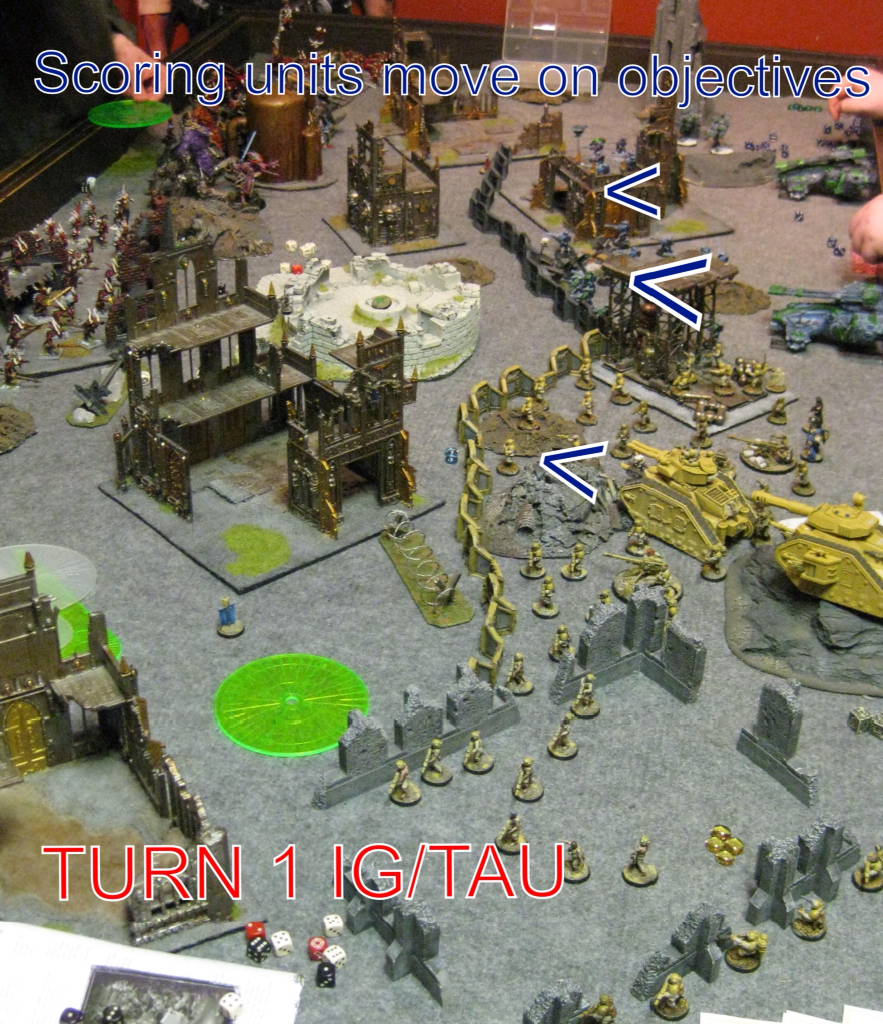
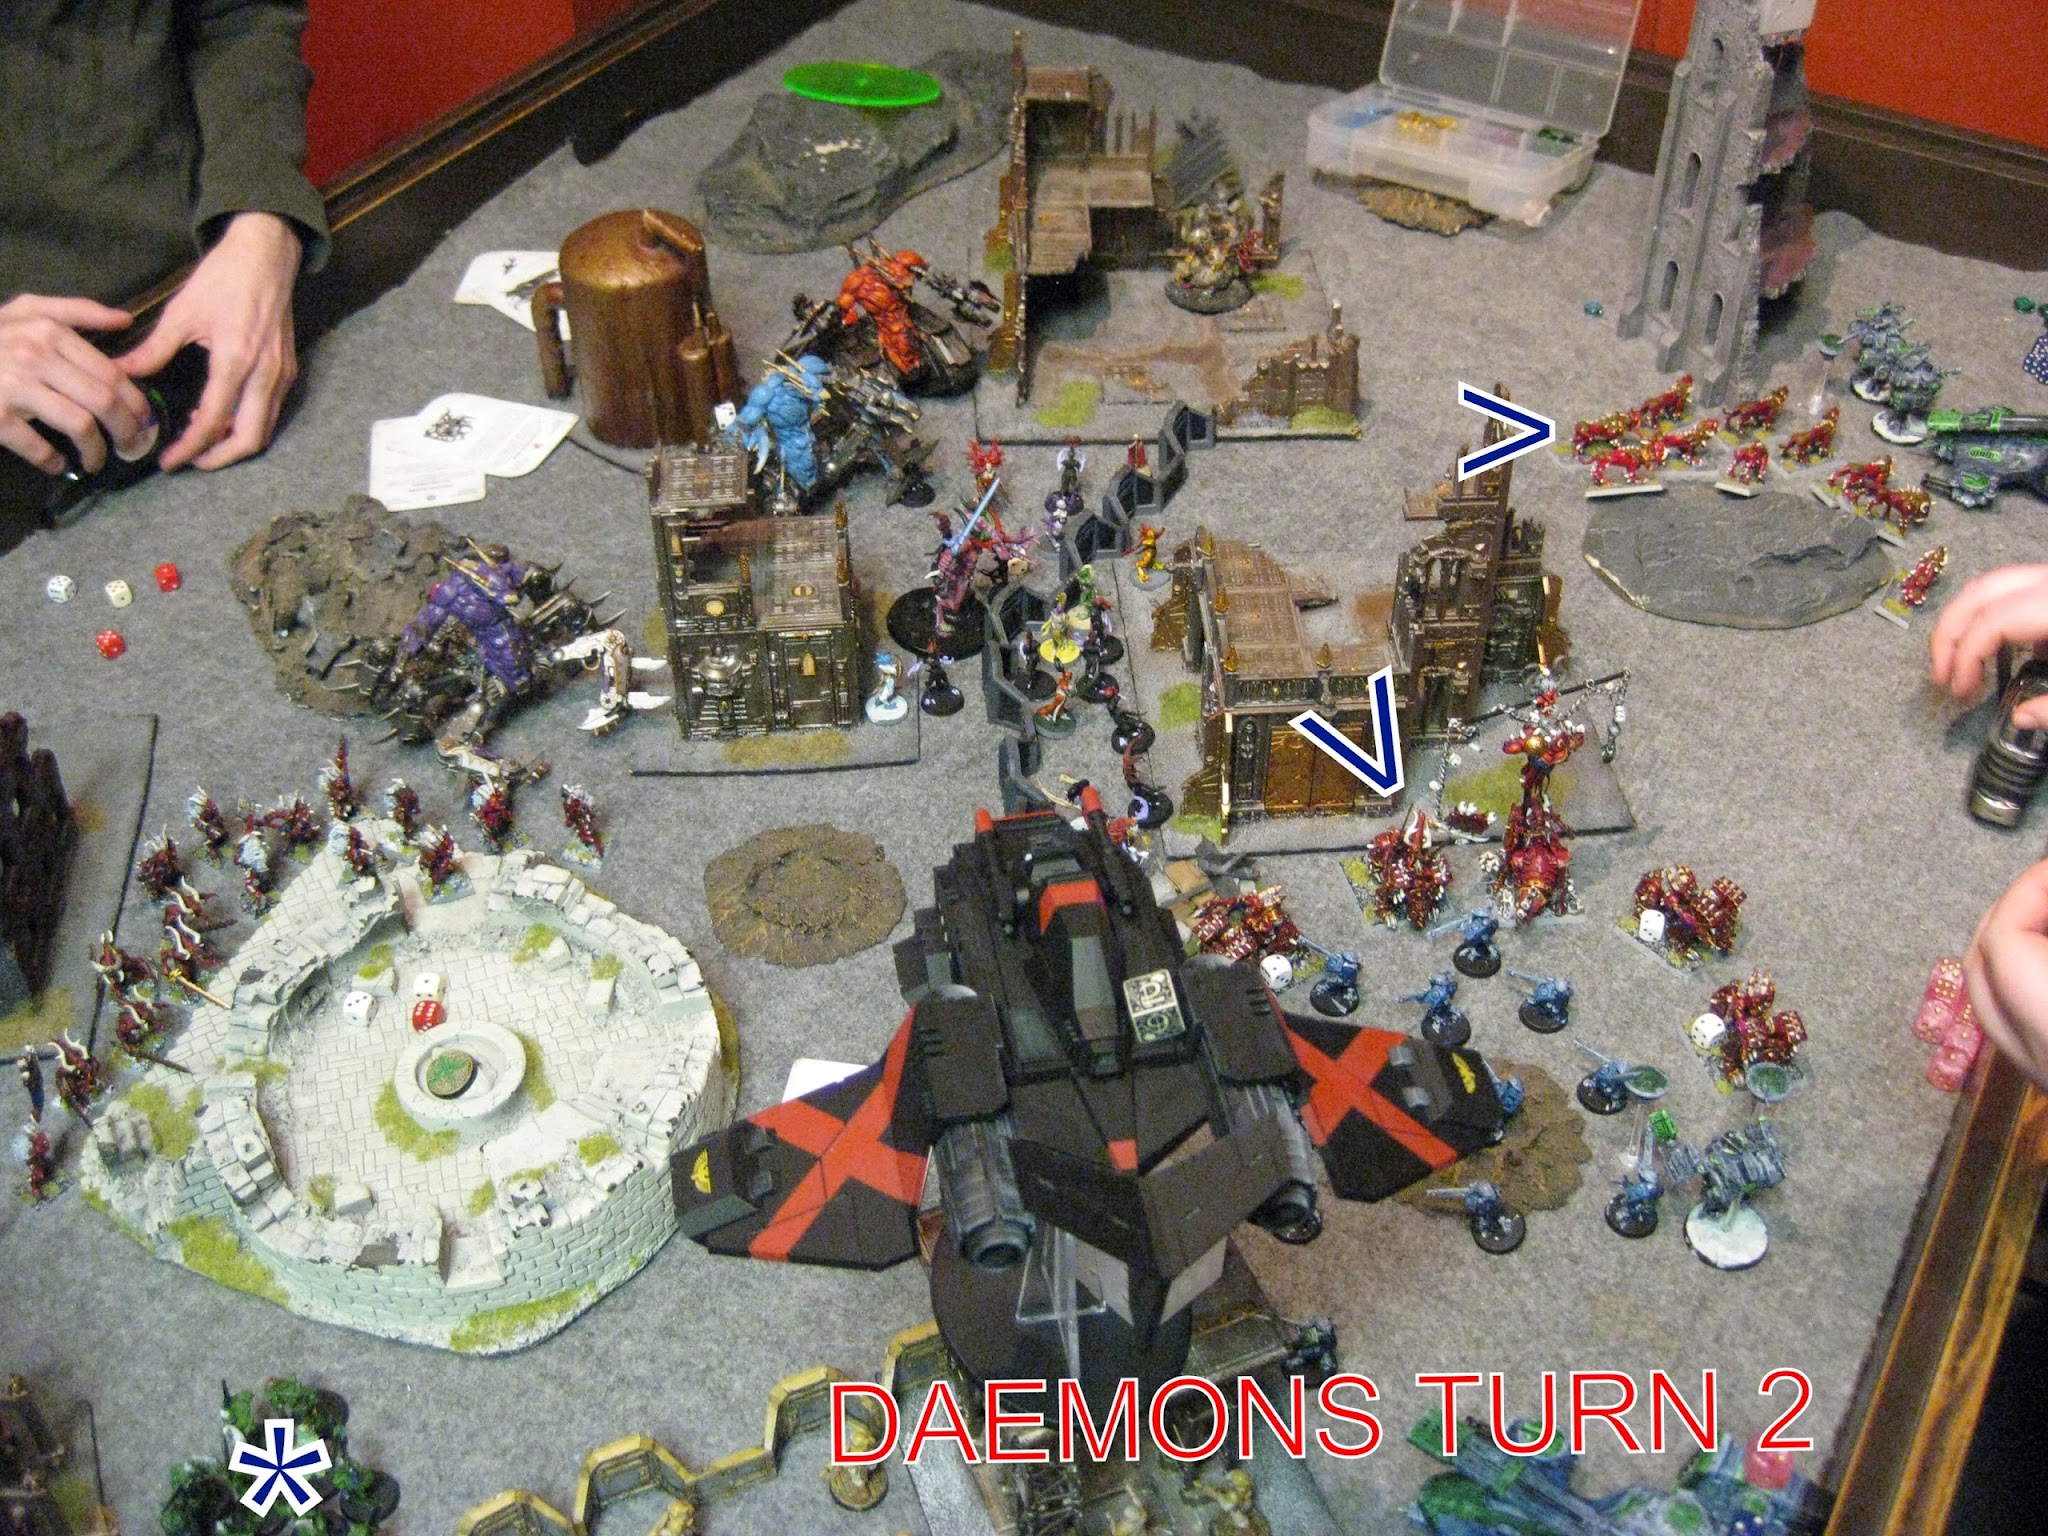
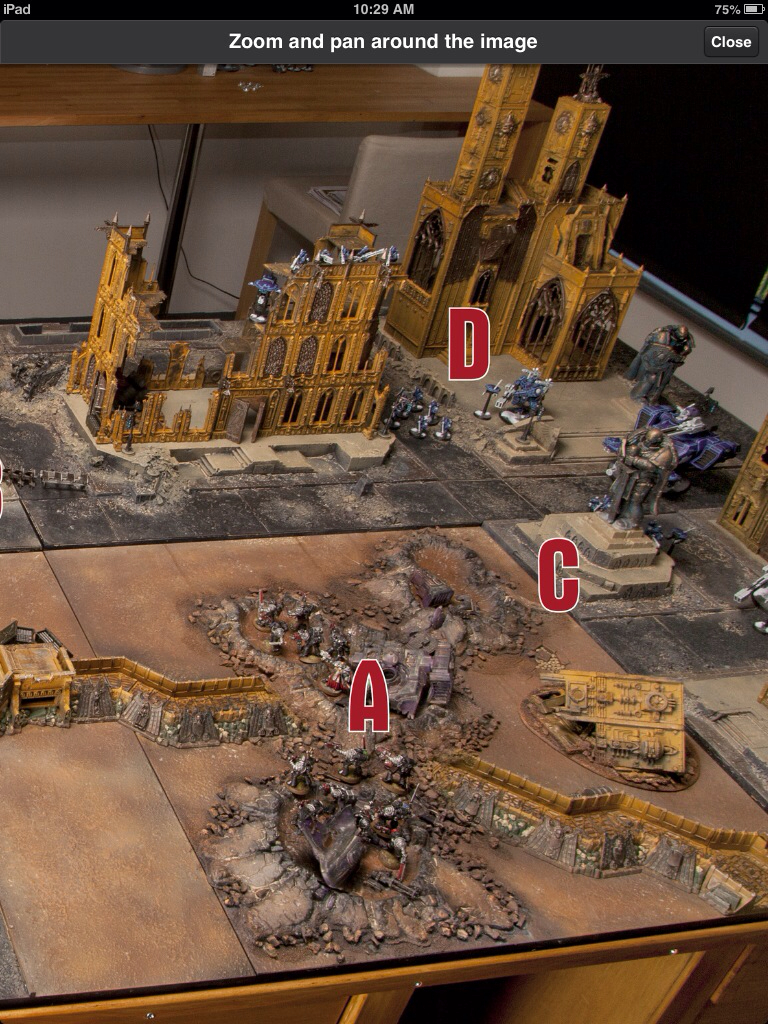
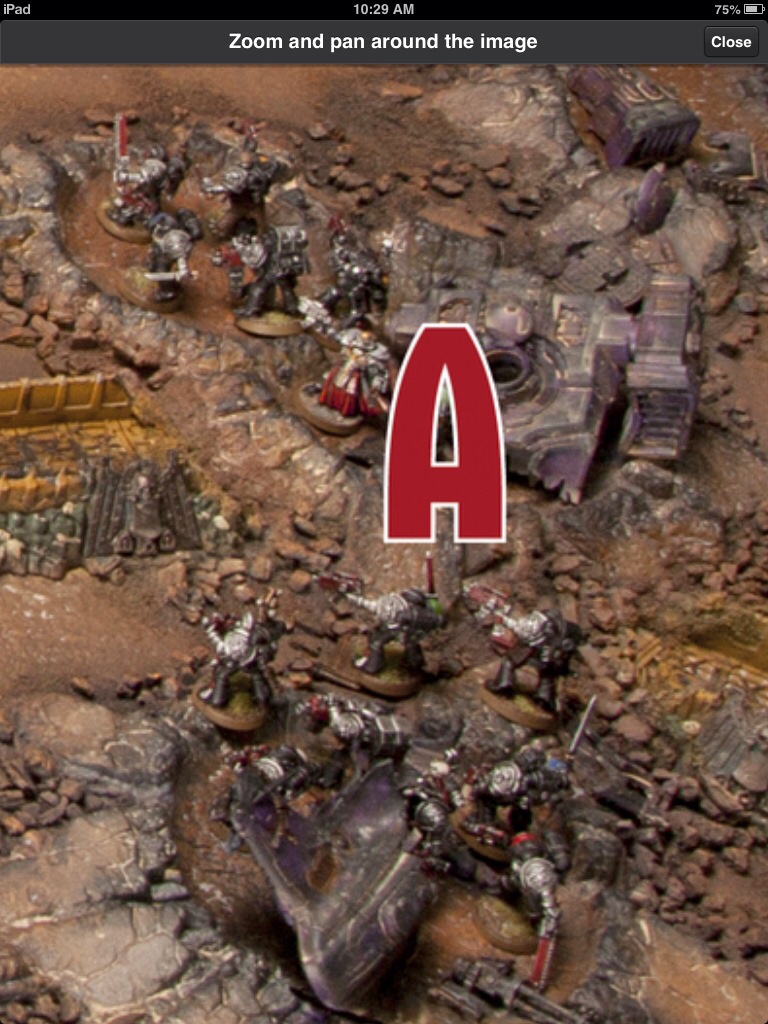
The scenario was a modified 'Crusade' with four minor objectives placed by each of the four players (see the photo above, IG 1, Tau 2, Daemons 3 and 4), and three major objectives across the centre (A, B, C). At the end of Turn 4, two of the major objectives would be randomly removed, thus encouraging the armies to either spread out and contest all three, or bet on the 1/3 chance of their preferred objective remaining. As you can see the Tau and Imperial Guard spread out evenly, while the Daemons used a refused flank deployment to overwhelm the centre and far major objectives. You may also notice the Khorne player has placed their objective (3) in the enemy table half, in between the two opposing armies!


Winning the first turn, the Tau and IG immediately move up to the objectives, and to their respective fortifications. With no flamers in the Chaos Daemon army, and all models seemingly far enough away they seek to dictate the flow of battle and secure board control early on. Shooting sees a Soul Grinder lose some hull points, and a couple of lesser daemons die as well.


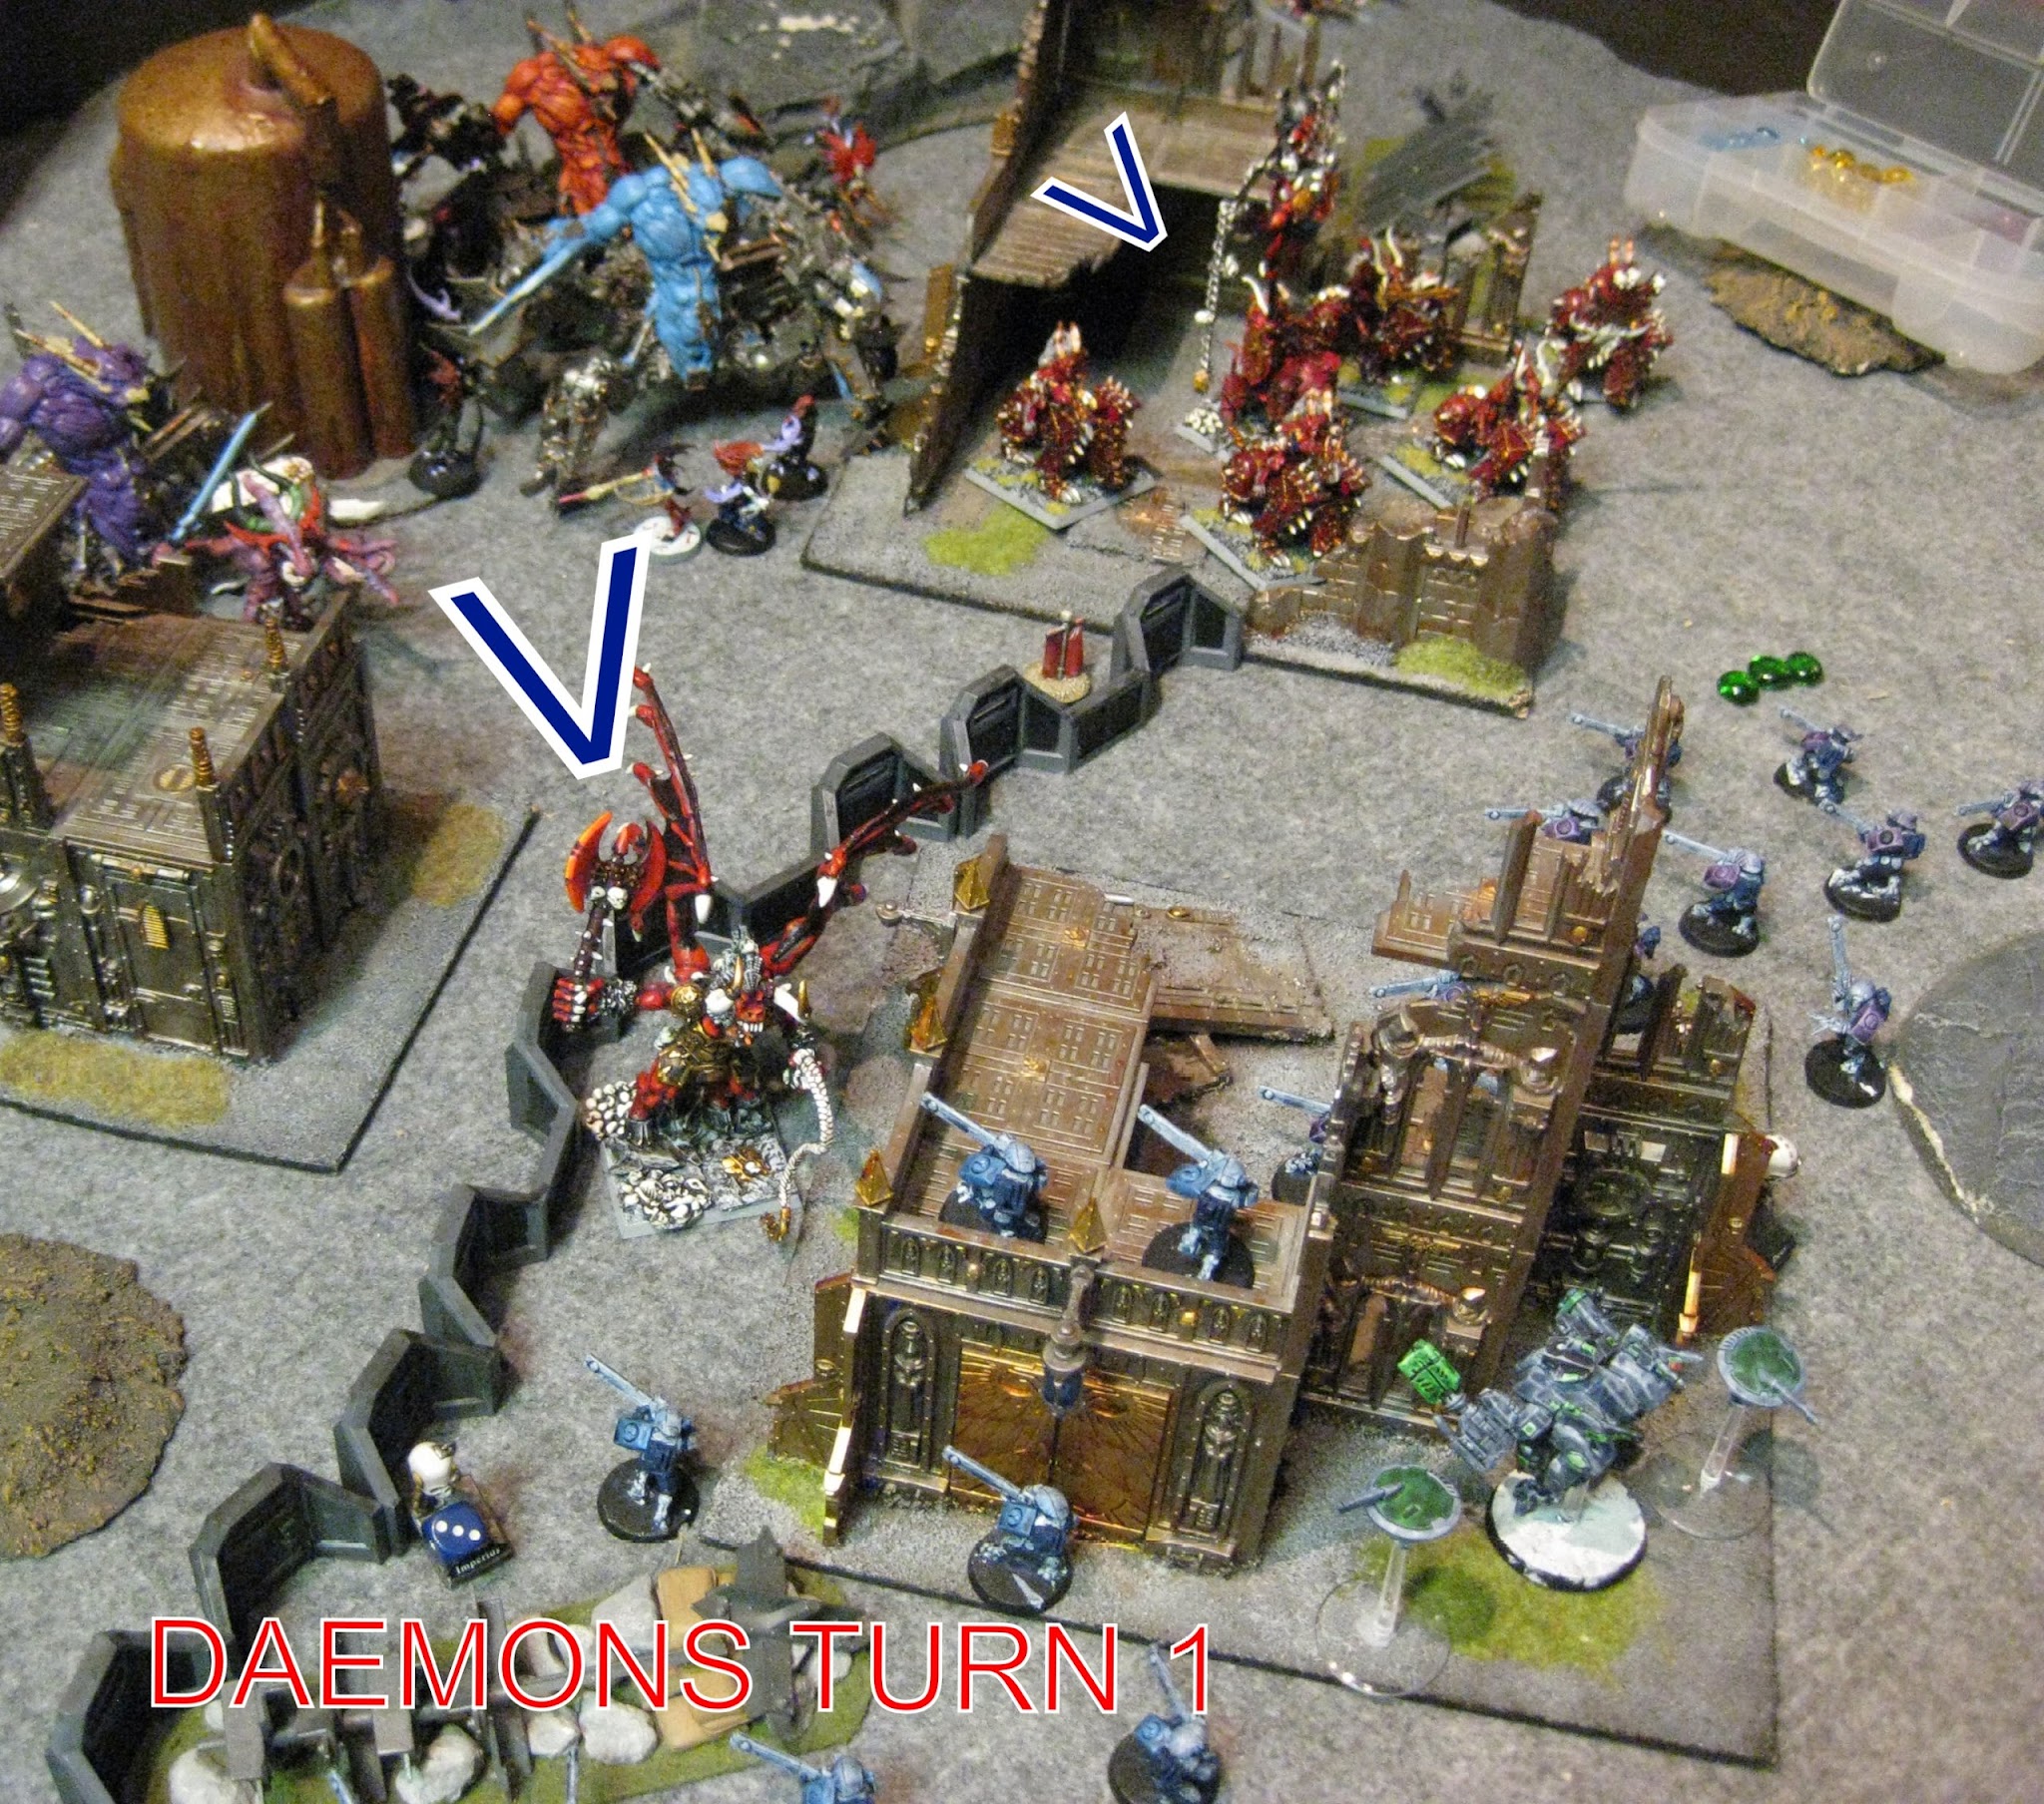
In response the Bloodthirster takes to the skies, placing itself bang in front of the Tau force, while the Juggernauts surprise everyone but the Khorne player in using their Cavalry move to completely ignore cover and set themselves up for a Turn 1 charge! The rest of the Daemon army trundle forward, with some particularly poor difficult terrain rolls for the Bloodletters (not pictured). Assault sees the Juggernauts make it into combat due to Fleet, and wipe out the Tau Firewarrior squad with the loss of only one wound! First Blood to the Chaos Daemons.


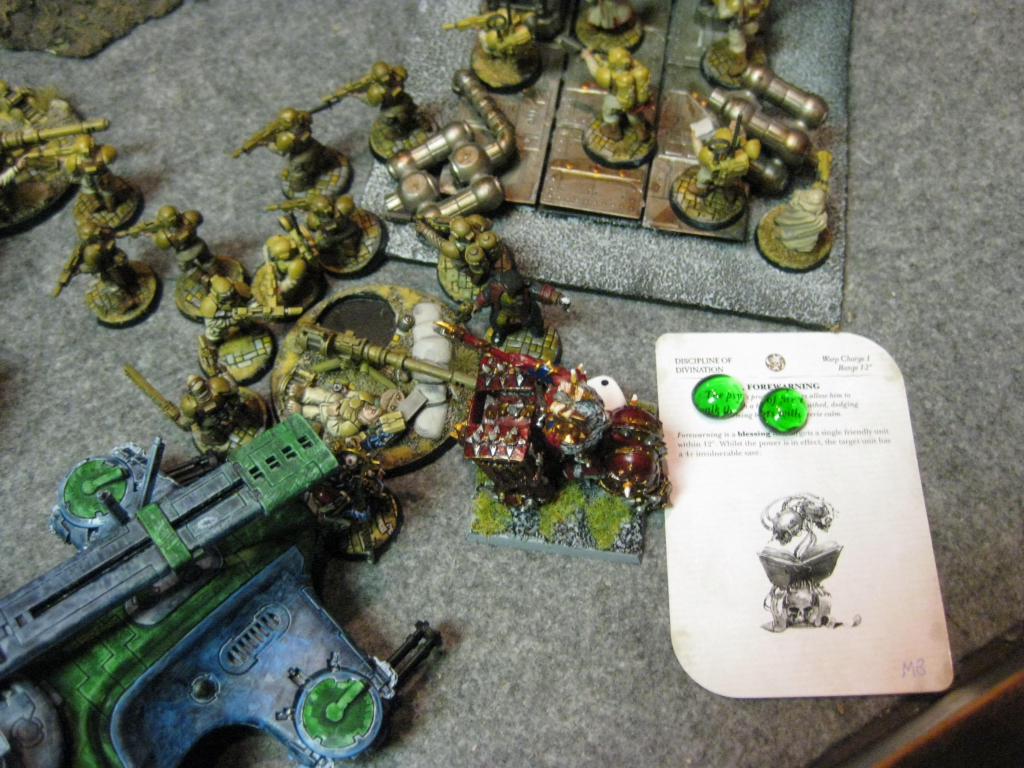
The IG/Tau alliance is now on the back foot, with rampaging Juggernauts and a flying Bloodthirster in their table half, with the rest of the Daemon army not far from the objectives! A good roll for reserves sees the Stormraven arrive, but with three Skyfire Soul Grinders still alive it has to chose targets wisely. The Tau army opens up on the Juggernauts, taking a few wounds off, while the Imperial Guard tanks and infantry fire away at the mass of Bloddletters on their side of the table. Careful target priority sees the Bloodthirster first 'grounded' by hits from the Stormraven, then killed outright by the remaining Tau and IG who had not yet shot. A rewarding Slay The Warlord victory point, but a lot of firepower that could have been used elsewhere.


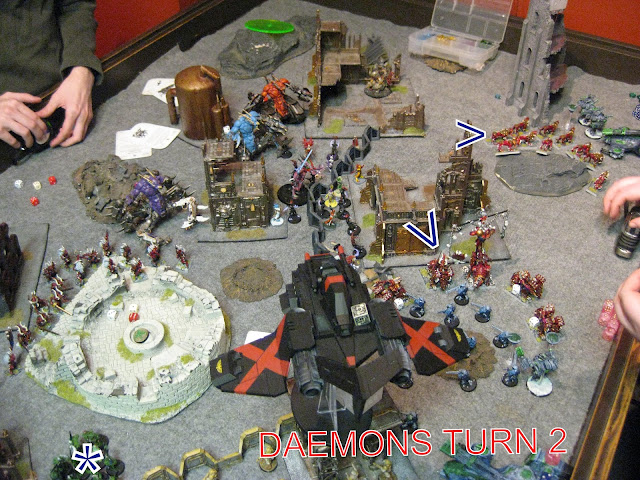
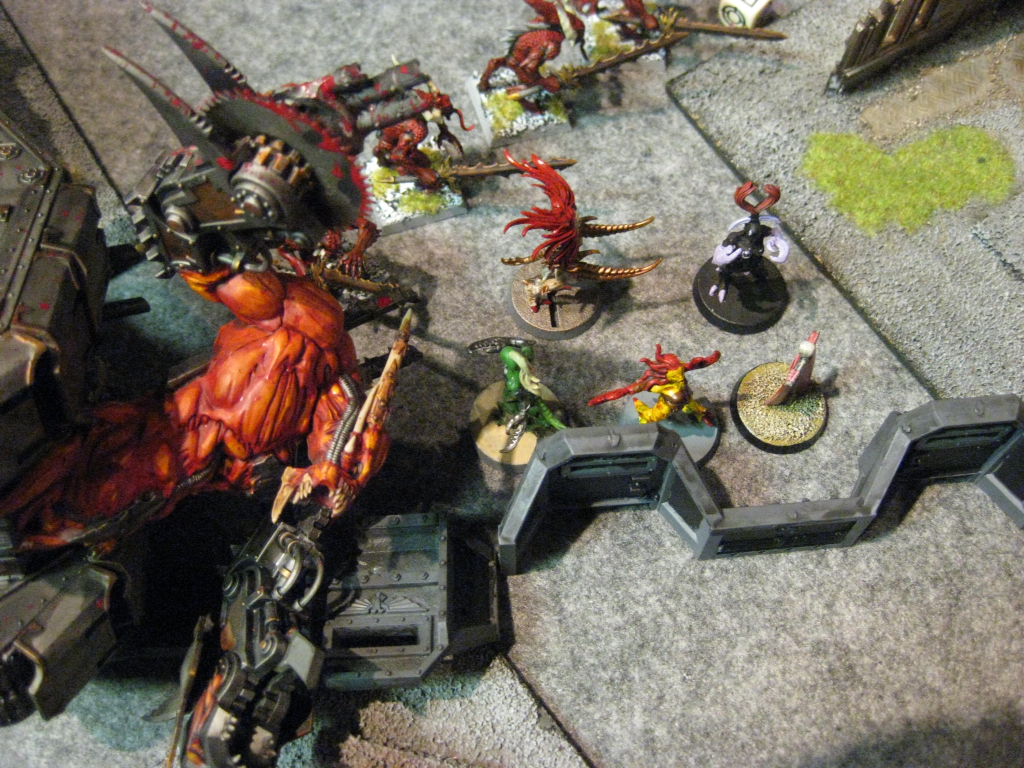
Excellent reserve rolls from the Daemons see two squads of Plaguebearers arrive and deploy near the Daemon home objective and in front of the Imperial Guard to take the heat off the Bloodletters. The wounded but full model count Juggernauts position for a charge against the second Tau Firewarrior squad, again ignoring cover movement restrictions due to being Cavalry. The Soul Grinders position for shots against the Stormraven, their Strength 7 Skyfire shots taking two of three hull points away. The Daemonettes move up to their major objective 'C', while the Bloodletters hide behind scenery in the centre of the table near objective 'B'. Predictably the Juggernauts wipe another Tau squad, this time with no overwatch fire against them due to a Chaos Daemon Psychic Power (I don't have a copy handy sorry).

H1N1 Nurgle style...

It should also be mentioned that game was fought using the 'Daemon World' rules from the Crusade of Fire campaign book, which when combined with the new 'Warp Storm' Daemon rules made for a very random (chaotic?) gaming experience! I will not go into detail too much as there weren't any great game changing moments using the 'Daemon World' rules, except to acknowledge the loss of nearly half the IG Platoon due to a particularly bad outbreak of pestilence from Nurgle's Garden (Every model in a specified unit must take a toughness test!) at the start of Turn 3! The same fate also claimed a number of Daemonettes, such is the fickle nature of Chaos!

*Death Company charge and wipe out the Plaguebearers thanks to Daemonic Instability

With the Stormraven still alive, it switched to hover mode and deployed its cargo of Death Company. The Hammerheads moved as far from the Daemons as possible, while the Hounds lost a few models to shooting (but were immune to psychology tests from shooting casualties as per the new Daemon rules). The Librarian cast 'Forewarning' on the remaining Firewarriors, being Battle Brothers, to give them a slim chance of holding the Juggernauts back for another turn. Additional shooting and then combat saw the Plaguebearers in front of Imperial lines wiped out (The Death Company utilizing the Stormraven's Assault Vehicle special rule). However, the Greater Good were now pushed off their objectives and barely holding on!


With all Daemons in the table, having now half the army or less Deep Striking in their new deployment rules, they could bring their full strength to bear where required. Alas I was too busy biting my nails at this point to take too many photographs (As predicted the Soul Grinders made scrap metal out of the Stormraven), but as you can see a Juggernaut survived the combat with the Firewarriors, forcing them to flee, and in it's Turn 3 charged the Imperial Guard, who through weight of attacks finally tore the Bloodletter from his mount. The Bloodletters on foot had by this stage avenged the loss of the Plaguebearers, dispatched the Death Company, and were in prime position for claiming the central major objective 'B'. The Crysis suits in the far corner had also become buried under a pile of Chaos Hounds!


Turn 4 dawned with a glimmer of hope as the last Crysis suits arrived from reserve, toasting one of the Soul Grinders and putting pressure on the Daemonettes babysitting the objective. The firepower of the Leman Russes and Hammerhead also took out another Soul Grinder, while the Imperial Guard moved back onto their minor objective in preparation for...


...being charged by the Keeper of Secrets! With the distraction of the Khorne Daemons, the Imperial/Tau forces were caught off guard once again as this 'Fleet' equipped Greater Deamon arrived much sooner than expected, withering the mediocre overwatch fire and assaulting the near last of the scoring troops on the enemy side. The only un-engaged troops were the Penal Legion, guarding the third major objective 'A' in case of a lucky roll at the end of the turn. You may also be able to pick out a Daemonic Herlad of Khorne in the photo above. This is the unfortunate Blood Angles Librarian, who earlier in the same turn failed a Leadership test on three dice and turned into a Daemon thanks to the new 'Warp Storm' table in the Chaos Daemon Codex!

The Librarian is sucked into the warp snd replaced by a Herld of Khorne!

With the end of Turn 4 seeing the Imperial Guard holding for now, the random major objective was rolled for, and the Daemonettes were gifted the true objective, denying the Imperial forces any hope of winning the game.


Turn 5 was played out, with the last Soul Grinder falling, obscuring any long ranged shots against the Daemonettes. The Imperial Guard finally broke in the face of the Greater Daemon of Slaneesh, and the only surviving Imperial forces were the Penal Troops, stuck out in the open as their objective was removed at the end of the last turn. The remaining Crysis suits, including the commander, had been dispatched by this stage and were unable to contest. A crushing victory for the forces of Chaos, and an excellent example of how the speed and mobility of the new Khorne Daemons, and Skyfire from the Soul Grinders, combined with a few lucky Warp Storm rolls and effective use of Psychic Powers tipped the balance against the Imperial Gaurd and Tau forces.

Stay tuned for an equally compelling Tau victory next game!

Saturday 6 April 2013

White Dwarf for iPad Review

With a six hour plane ride home from holidays and no White Dwarf in sight at the airport news stand, I purchased the latest edition of White Dwarf via the iBooks online store and waited patiently as the (rather slow) airport wifi did its thing. With the promise of being able to zoom in on battle report photos, play extra video content, and greater navigation with links and digital Contents page (not to mention cheaper price and no need to store the physical magazine at the back of the cupboard for future reference) I was unashamedly excited by the prospect of some 21st century Games Workshop content.


As you can see this particular issue is dominated by the release of the Tau Codex, along with the usual columnists, new releases, miniature showcases and general hobby articles. Navigation was a breeze, with a slider across the bottom of the page, individual sections accessible by moving the contents page vertically via the red titles, and individual pages a single tap away.


There was a fair amount if effort to make the digital version different from the print version, with text and/or photos appearing at different stages, highlighting certain points and making it feel more interactive. There's a fine line between interesting text animations and irritating high school PowerPoint presentations but I think Games Workshop got it spot on.


What was a problem was the navigation within the miniature showcase section. Here the text stays on the page while you are supposed to 'slide' the next photo into view as shown the by the red arrow, and the four little dots below the photo. Above we can see the Eldar are the second of four photos on this page, as shown by the shaded dot underneath. You are then able to slide to the next group of photos by swiping along the bottom of the page. With no zoom function, and read on my iPad mini, each of the models ended up about two inches high on the screen with no option other than to squint for detail. No different to holding a magazine up to your nose I guess, but it would be nice to use the whole screen to view the models in the digital version. At one point the whole thing froze leaving no photos at all!


Where the zoom function was offered, as part of the battle report, it worked really well. You could zoom in on the individual areas where models would otherwise have been lost in the scale of the photograph. In the photo below the Space Marines are completely lost amongst the rubble on objective A, but by zooming in you can see exactly what's happening. It's also offered the chance to get a really good look at the scenery made especially for this battle report.


The scenery, or gaming table, was also the subject of a time lapse 'making of' video which was a really cool addition to the digital magazine. It really showed how much effort was required to get this table ready, and it was funny to see some of the newer staff members running around all over the place, while the more senior members sat relatively still in classic managerial style (albeit with a paint brush or two in hand). The slightly compressed quality let it down though, and I was unable to rotate it to landscape mode either, possibly something in the settings I missed.


I had a lot more screenshots to share illustrating the nifty swipe, zoom and navigation links throughout the magazine, including links to prices of models by clicking next to them, rather than using up screen space with advertising, but I realised most of them actually including spoilers of the battler report and such so no bueno. One of the things I enjoyed most was the extra artwork and full screen photographs of the new models. With any Apple device you can easily take a screenshot at any time so it was great to be able to use the full screen photos for wallpapers straight from the magazine, and to store and edit pictures for later painting reference. You can always just open up the digital magazine again at a later date as it's all there on your device.


As you can see I have limited this review to the digital format rather than content of the new White Dwarf, there are plenty of reviews of both the old vs new White Dwarf, bemoaning this and that and calling it nothing more than advertising, but I think the magazine comes across a lot more professional in its digital format. There are no prices unless you go looking for them, no endlessly long retailer lists, and at a cheaper price and (for me personally) more convenient format I will probably not buy a printed White Dwarf in future.

As for what they can do to improve it in the future, I would like to be able to zoom in closer on the model showcase, and content wise more information regarding rules is a must. The last White Dwarf I purchased for the launch of 6th Edition made heaps of references to new rules, and even without explaining them in detail it certainly whet my appetite for the new edition. Rather than little breakout boxes for new Tau rules I had to read all about Tyranid rules from 2010 in equal measure throughout the battle report, and it would have been nice to see the Tau paired up with another 6th edition Codex for some side promotion and to let us know they hadn't forgotten about something they released only two months prior!

As for their amazingly quick release schedule? That's a whole other topic!